Monday, January 30, 2012

Jan 30, 2012

9:00am-5:30pm

Another great day working on the mandolin. I'm really getting into this!!

Today we worked on gluing up the body sides, did some additional carving on the neck and book matched and glued the top.

These are two piece of the sides that developed several small splits when being bent. The splits were glued and held together with wood blocks and 'c' clamps. After removing the clamps, the split were no longer visible.


This pic shows all the side pieces and blocks in the mold fully glued up. The small wedges near the top block are used to keep the sides snug to the block as the glue dries.


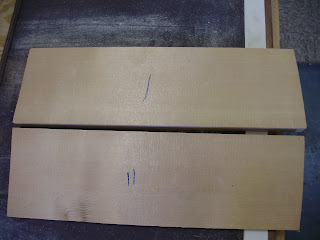
Here we're showing the quartersawn spruce top cut down the middle. (correction to a previous post: age of spuce drying is not 90 years, but has been drying since 1967).


After making sure the two pieces of the top were perfectly joined, we glued them together using these clamps. Once the glue had set, we ran the top thru the drum sander getting the bottom and top perfectly smooth and 14mm thick.


Here's the neck with the russ rod wrench opening formed and smoothed out. Got to use my wood carving tools on this. I knew they would come in handy!


This is the heal of the neck carved out and sanded. I used 100, 150, 220, steel wool and a wool sock (yes, like the sock you put on your foot!) to get a finish that is as smooth as glass.

Jan 27, 2012

9:00am. - 5:30pm.

OK the curly maple has arrived! It's now time of bend the sides into the mandolin mold. The sides of an mandolin are 1 9/16 inch wide and need to be sanded down to 2.8 mm thickness. Again this is an easy task using a self feeding power sander. A measuring gauge was used to make sure we had the proper thickness.

Here's the wood used for the sides:


The next step is to soak the sides in water so that they can be hand bent using the bending iron:

This is the bending iron used to bend the sides. Yes, it's very hot!!


Here's Mark showing me how to bend the wood:

With the sides bent, here's everything in the mold. The sides required four separate pieces to complete the circumference of the body. Note the 'c' clamps and wedges keeping everything nice and tight. We'll let this dry for several days before using any glue.


The next step is to start creating the neck. Again, we're using curly maple. The neck was cutout from a solid block and required a lot of measuring and cutting on the bandsaw to get to this stage.


With the neck roughed out, we now needed to cut a channel for the truss rod. Note the extra cutout on the left side of the channel. This needs to be sized to accommodate the truss rod bolt, washer and wrench.

Jan 17-26, 2012


Since we're waiting for the curly maple to arrive from the supplier, Mark said to start thinking about the design I would like to put on the head stock. I'm thinking my initials and something with a honey bee or hummingbird in the design. Maybe some sort of flower underneath. Here's some of the things I've been playing with:


Jan 16, 2012

11:00am - 5:00pm

My first day at Bluett Bros Violins!

The goal today is to build all the blocks that hold together the body of the mandolin. These blocks are internal, so they don't have to be too perfect. Guess that's why Mark has me starting here! The exception to this is the head block which has that fancy scroll at the top. All blocks are made from Honduran mahogany. I used a plastic template and tracings from Mark's mandolin mold to obtain the shape for the various blocks. I made a total of 4 blocks: head block, tail block and two blocks for the points on the side. Using the band saw, and various power sanders, this turned out to be a pretty easy task. The exception again being the top scroll which required a lot of hand filing and sanding. Final fittings for these blocks will be when we fit them with the side pieces. Here's a picture of the blocks sitting in the mold:


With the blocks completed, we're now on hold until the wood for the sides, back and neck arrive from the supplier. We're using curly maple for these pieces. The top fill be spruce which Mark has a ready supply that has been drying for 90 years!

Jan 2, 2012


This blog is all about my making of an F5 Mandolin at Bluett Bros. Violins http://www.bluettbros-violins.com/

For several years now I've been wanting to make a sting instrument from scratch. Being frugal with money, I've never been able to open my wallet wide enough allowing me to work with a luthier to build an instrument. Sensing this, my wife surprised me with an apprenticeship with Mark Bluett this year for Christmas.

For those of you that aren't familiar with F5 Mandolin's, here's a picture of me holding my Washburn F5 style mandolin.


Technically, it's a Washburn model M3SW, but most folks refer to this style as an F5. F5 is actually a mandolin model first created by Gibson. If you interested in the history of all this, you can read more at http://www.vintagemandolin.com/mandohistory.html

So now the pressure is on. I can't screw this up!