Monday, July 30, 2012

July 30, 2012

9:30am - 5:00pm

Finally, after several days of sanding, it's time to stain!!

This is the mandolin before applying any stain:


I'll be doing a sunburst finish using an alcohol based leather dye as the stain.
Step 1 was for put Med Brown on the back, sides, front and neck.


Step 2 was to apply Cordovan to all outer edges.
Step 3 is to apply Brown between to two other stains blending them together.


This is the mandolin after staining:


The next step is to scrape all the binding on the mandolin. Here's a shot showing a small piece to the binding scraped.

Friday, July 27, 2012

July 26, 2012


10:00am - 5:00pm

Today I sanded and sanded and sanded......


Tuesday, July 24, 2012

July 24, 2012

9:00am - 5:00pm
The neck is  finished!
Here's a shot of it. How's it look?


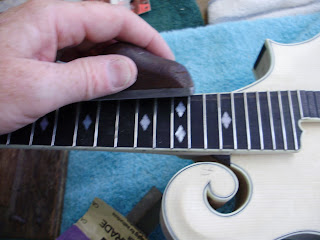
Next up, level the frets. The fingerboard was glued to the neck the other day, but I need to make sure the frets are all perfectly flat. First step, file the fret sides smooth and even with the neck binding.


Finish this off by using a fine file.


Now I'll make all the frets flat and even on the top of the fingerboard. Using a smooth flat starting at the lower fret, I file upward to the first fret. I do this until all frets have a flat surface. All frets should now be even. 


To make sure all frets are flat, I test them using a small metal ruler. I hold the ruler over frets 1, 2 and 3 pressing the ruler down between frets 1 and 2. Next, pushing on the top of the ruler over the 3rd fret, there should be no gap between any of the frets. I do this same measurement one fret at a time until all fret have been checked. Everything was nice and even!


After making sure frets are flat, I now round the tops off using this fret tool.


Here what the frets look like so far.


The last step (sorry no pics!) is to sand the frets using 220, 1200, 8000 grid sandpaper. Sanding is done by wrapping the sandpaper in a small block then sanding using only the edge of the sanding block upward and downward over the fretboard 6 times each. I then polished the fingerboard using steel wool and a wool sock.

Now we're getting close to starting the staining process!!

This is a short video showing the mandolin so far.
(Turn your volume down.
Someone had to turn the bandsaw on right when I was shooting my video!)

Thursday, July 19, 2012

July 19, 2012

9:00am - 5:00pm


With the fingerboard glued to the neck, it was time to tackle the last major part that needed to be made on the mandolin: shaping the back of the neck. This was accomplished by filing the sides of the neck small sections at a time. In this shot the first part filed would be the edges of the neck on each side.


This shows the one side of the neck filed. I'll then repeat this on the other side of the neck.


The next section to be filed would  be the area  between the two parellel lines. Again, repeating the same on the other side.


After several other parellel line filings, this is the roughed out neck. Also, I need to make sure that the thickness of the neck was correct. This should be 5/8" at fret #1 and 11/16" at fret #8. The pencil marks are showing the location of #1 &#8 frets.


The lower part of the headstock must then be shaped to the contour of the previous side filings. 


I'll finish cleaning up the next at my next session.

July 18, 2012

9:00am - 1:30pm


Here it is! The extension is filed and sanded and we're ready to glue the fingerboard on.


This is a shot of the fingerboard glued and clamped onto the neck.


Also stuck a couple of wedges in the tail end of the fingerboard to make sure it had contact with the extension piece.


This is a shot of Sam. He's building his first instrument which is a viola. In this shot he's scraping the inside of the back.


While waiting for my fingerboard to dry, I fitted the bridge to the contour mandolin body. This is done by placing 100 grit sandpaper on the body (face up!) and moving the bridge side to side.


This is the bridge fitted to the body. Note that the bridge on a mandolin does not get attached to the body. It's simple held in place by the strings.


Here's a shot of the mandolin with the bridge attached.


Tuesday, July 17, 2012

July 17, 2012

9:00am - 4:00pm

OK, just had another 2 week break. Mark was at the shore for 2 weeks, so I didn't go into the shop. But, I'm back now.

Reamed the holes on the headstock to fit the tuners.


Here's a shot with the tuners inserted.
Also, made my truss hole cover today. Used ebony.


I also glued the fingerboard extension to the body and started filing it flat to match the neck.


This is a shot of the fingerboard laying in place, but not glued yet.
A little more fitting and I'll glue the fingerboard to the neck.


Finally, a shot of the mandolin with some of the hardware.