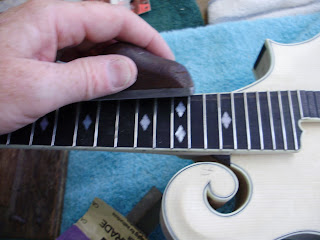
The neck is finished!
Here's a shot of it. How's it look?
Next up, level the frets. The fingerboard was glued to the neck the other day, but I need to make sure the frets are all perfectly flat. First step, file the fret sides smooth and even with the neck binding.
Finish this off by using a fine file.
Now I'll make all the frets flat and even on the top of the fingerboard. Using a smooth flat starting at the lower fret, I file upward to the first fret. I do this until all frets have a flat surface. All frets should now be even.
To make sure all frets are flat, I test them using a small metal ruler. I hold the ruler over frets 1, 2 and 3 pressing the ruler down between frets 1 and 2. Next, pushing on the top of the ruler over the 3rd fret, there should be no gap between any of the frets. I do this same measurement one fret at a time until all fret have been checked. Everything was nice and even!
After making sure frets are flat, I now round the tops off using this fret tool.
Here what the frets look like so far.
The last step (sorry no pics!) is to sand the frets using 220, 1200, 8000 grid sandpaper. Sanding is done by wrapping the sandpaper in a small block then sanding using only the edge of the sanding block upward and downward over the fretboard 6 times each. I then polished the fingerboard using steel wool and a wool sock.
Now we're getting close to starting the staining process!!
This is a short video showing the mandolin so far.
(Turn your volume down.
Someone had to turn the bandsaw on right when I was shooting my video!)
(Turn your volume down.
Someone had to turn the bandsaw on right when I was shooting my video!)


No comments:
Post a Comment